How To Install A Car Exhaust System - Muffler, Catalytic Converter, Exhaust Pipe, Flex Pipe
Share
These days, hiring a mechanic to change your oil can be pretty expensive. Changing the entire exhaust system could cost you an arm and a leg. Whether you are trying to save a bit of money or wanting to rebuild your dream car with a hands-on approach, you need to know how to install a car exhaust system. Here is what you need to know to get started.
Knowing the Parts
There are four primary parts to a car exhaust system. Here’s what they are and what they do:
Muffler
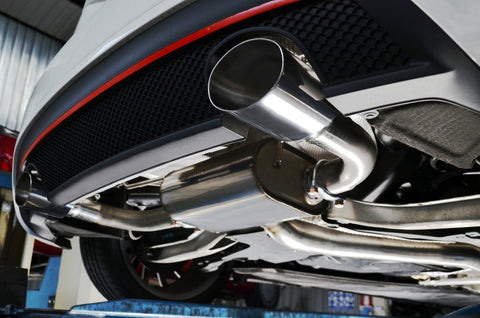
The muffler serves a similar purpose as a silencer on the end of a gun. The loud sounds that need silencing are produced during the combustion process. These sounds are essentially a lot of small explosions. You can tell if a car doesn’t have a muffler or it has been damaged because of the very loud sounds as the car will make a lot of noise when the engine is revved. The muffler is usually visible on the bottom of the car at the back or off to one side.
Catalytic Converter
It is located between the exhaust manifold and the muffler. The catalytic converter is a safety feature in combustion engines. When the explosions occur within the engine, they produce several different types of gases. This includes very harmful carbon monoxide and other hydrocarbons. The catalytic converter converts harmful gases into less harmful gases like carbon dioxide and water vapor.Exhaust Pipe
The exhaust pipe is basically like the subway for the gases produced by the engine that need to be released. This is usually made of steel, stainless steel, or aluminized steel. Steel is the cheapest option, but stainless steel is the best option. It lasts longer due to its corrosive resistant properties. Without the exhaust pipe, the rest of the exhaust system can’t function, it is like having an assembly line without a line or a train without tracks. 
Flex Pipe
The flex pipe is designed to protect the exhaust system from any damage due to movement in the motor. Though specifically designed for front wheel drive vehicles, it is also added to most all-wheel drives. It serves as an extra layer of protection. You will want to make sure you have this piece or you might be replacing your exhaust system again before you know it.
Choosing the Right Parts: Aftermarket Vs. Manufacturer Parts
Manufacturer parts are basically parts that are produced with the brand name on it, genuinely by the manufacturer or by certified manufacturers specifically for use in that make and model of vehicle. That means if you buy a Ford exhaust pipe, it has the Ford name on it, Honda has the Honda name, and so on. Aftermarket parts are parts are produced by other companies to fit your car as replacements or upgrades.
Some people swear by manufacturer parts and will argue that aftermarket parts are cheap knockoffs. However, aftermarket parts can be specifically customized for that vehicle. But for the parts that you need to replace your exhaust system, here is the more likely reality.
A lot of the times the auto part supplier will produce the manufacturer parts and the aftermarket parts. That means that they are basically the same parts. The only difference is the name stamped on the parts. In your case, buying aftermarket parts should produce the same quality of parts for a fraction of the cost because you don’t have to pay for the name.
Installing the Parts
Installing a new or replacement exhaust system is not a difficult task; however, it does require you to lay on your back under the car. Make sure you take all necessary safety precautions while doing this. The whole process can actually be broken down into four basic steps:
Step #1: Lay Out All Parts in Order

Once you have purchased all the parts you need, you will want to lay out the parts in the order that they need to be installed. Start at the front and move back. If you are replacing an old system, you might be able to reuse parts from the old system so check to see if you are able to before purchasing a whole system.
Step #2: Dry Hang All Parts
After you have laid out all the parts, it’s time to get down and dirty. Climb under the car and remove all old parts. If you are not reusing any, you don’t have to be very careful when removing them. Then start at the front of the car to hang all the individual pieces and loosely bolt each piece into place on the upstream pipe. Don’t tighten the bolts until you have everything hung. This is to make sure all parts fit and you aren’t missing something. It will save you a little frustration if you need to remove something, you don’t have to completely unscrew it.
Step #3: Tighten All Parts
Once you have dry hung all parts, go back to the beginning and start tightening all the bolts. You will want to use a good amount of torque to tighten each segment to the one in front of it to help prevent unnecessary movement and unwanted leakages. When you finish tightening, make sure all parts are in line and to be on the safe side, check each bolt one more time to make sure they are tight.
Step #4: Test for Leaks and Repeat Step 3 (if needed)
After everything is in place and all bolts are tightened, you have to test it out. Get in the driver seat and crank the car. Leave it in drive and push down on the gas pedal for a few seconds. Then look under to see if you see any places where there are obvious leaks around the gaskets between each section.
Be Proud of Your Work!
That’s it. These are the basic ins and outs of replacing a car exhaust system. To recap:
- Four primary components: muffler, catalytic converter, flex pipe, and exhaust pipe
- Aftermarket parts as good as OEM parts and can save you money
- It takes four pretty easy steps to install: layout, dry hang, tighten, and test
If you have any further questions, you could consult a professional mechanic. Remember safety first, especially when climbing under a lifted car. Good luck on your mechanical adventures.
